 So this is how it ends, not with a bang, but with Nefarian. Hearthstone‘s (Free) Blackrock Mountain Adventure has reached its end with the last wing, The Hidden Laboratory, and now we’ll have to wait until the next expansion to get an influx of new cards. This wing was entertaining, although it felt easier than the previous ones.
If you haven’t played any of the previous wings, here are some guides and resources to help you defeat them:
Recent Hearthstone News:
- Want to Save on ‘Hearthstone’ Card Packs? Buy Them Through the Amazon App Store
- ‘Hearthstone: Heroes of Warcraft’ Beginner’s Deck-building Guide
- ‘Hearthstone’ for iPhone Now Available via Universal Update – Log in to Get Your Free Pack of Cards Now
- ‘Hearthstone: Heroes of Warcraft’ Beginner’s Guide – Starting the Game On the Right Foot
Blackrock Mountain Guides:
- Guide to Beat ‘Hearthstone’ Blackrock Blackwing Lair, Normal, and Class Challenges – Tips and Decks for Blackrock Mountain Adventure’s Fourth Wing
- Guide to Beat ‘Hearthstone’ Blackrock Spire Heroic, Normal, and Class Challenges – Tips and Decks for Blackrock Mountain Adventure’s Third Wing
- ‘Hearthstone’ Blackrock Mountain Guide: Free to Play Decks to Beat Heroic Blackrock Spire
- Guide to Beat ‘Hearthstone’ Molten Core Heroic, Normal, and Class Challenges – Tips and Decks for Blackrock Mountain Adventure’s Second Wing
- ‘Hearthstone’ Blackrock Mountain Guide: Free to Play Decks to Beat Heroic Molten Core
- Guide to Beat ‘Hearthstone’ Blackrock Depths Heroic, Normal, and Class Challenges – Tips and Decks for Blackrock Mountain Adventure’s First Wing
- ‘Hearthstone’ Blackrock Mountain Guide: Free to Play Decks to Beat Heroic Blackrock Depths
So, without further ado, let’s go see how to beat Nefarian’s monstrosities.
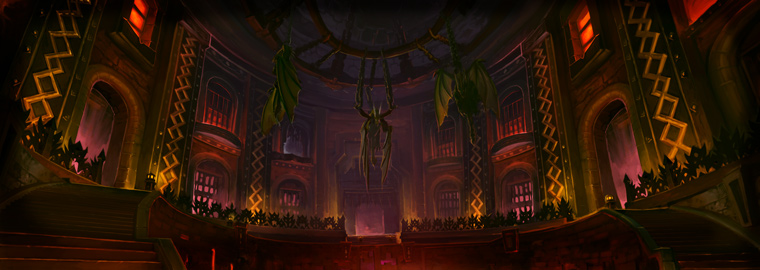
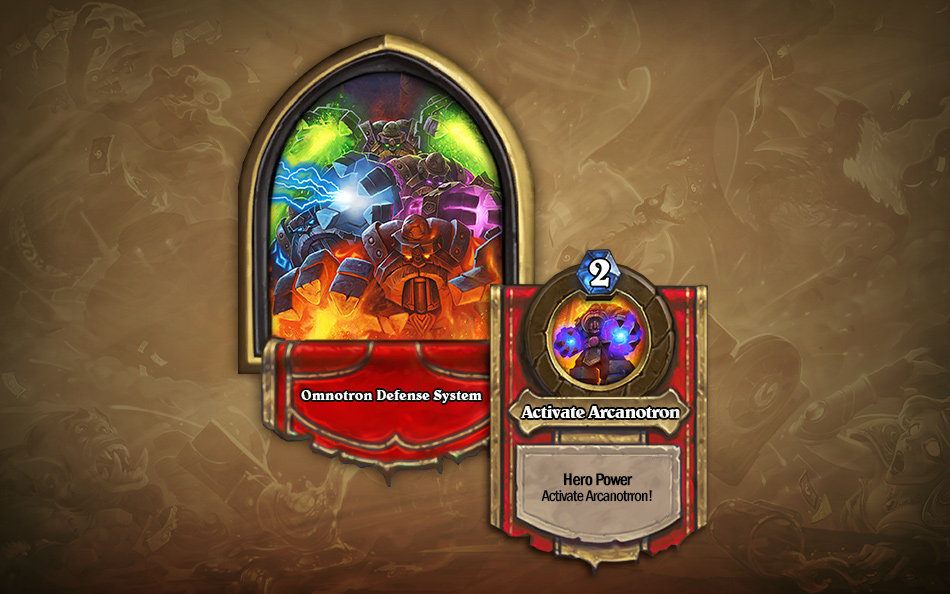
Omnotron Defense System Normal & Heroic Boss Guide
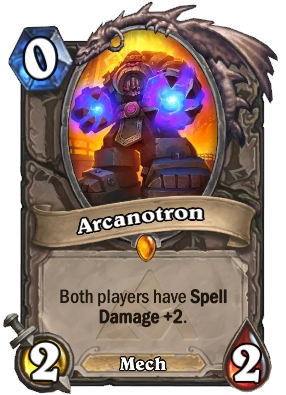
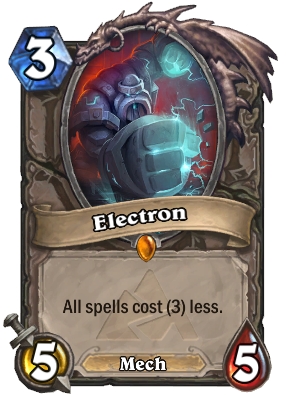
The first Laboratory Boss has 30 Health on both difficulties and an extra 15 Armor on Heroic. His Hero Power summons various Legendaries in this order: Arcanotron, Toxitron, Electron, and Magmatron. Once they are all summoned once, he starts summoning a random one each turn. The Mana cost increase for each Tron (2,4,6,8 respectively and then 4 for the random Tron), but on Heroic the Trons cost 2 less Mana each, which means you’ll be seeing them on the board earlier and more often. What you want to be doing to beat this Boss is set up the board and your plays according to which Tron will be coming next (or is currently on the table), so it’s good to keep their order in mind.
Arcanotron enables Spell Damage +2, so get some good spells ready when you Mulligan at the start of the game. Toxitron will deal 1 damage at the start of his turn, so don’t put weak minions on the board (unless you want any deathrattle effects to trigger on purpose). Electron will make spells cost 3 less, so load up your deck with 4,5 cost spells and hold on to them for some powerful and cheap combos. The last guy, Magmatron, deals 2 damage to whoever plays a card, so don’t plan on flooding the deck during the later turns with many minions to avoid getting damaged a lot. Instead, go with fewer, stronger minions to retain board control while getting as less damage as possible from Magmatron.
Omnotron’s Decklist is:
1x Magmaw
1x Enhance-o Mechano
1x Arcane Golem
1x Arcane Nullifier X-21
2x Iron Sensei
2x Clockwork Gnome
1x Cogmaster
1x Dragonling Mechanic
2x Mechwarper
1x Micro Machine
1x Earth Shock
1x Flamecannon
1x Arcane Missiles
1x Recharge
1x Reversing Switch
1x Time Rewinder
If you are having a hard time beating him, try LauraBF’s Mage deck:
2x Ice Block
2x Blizzard
2x Cone of Cold
2x Ice Barrier
2x Ice Lance
1x Flamecannon
2x Frost Nova
2x Frostbolt
2x Arcane Intellect
2x Fireball
1x Archmage Antonidas
2x Doomsayer
2x Gadgetzan Auctioneer
2x Acolyte of Pain
2x Sorcerer’s Apprentice
2x Mad Scientist
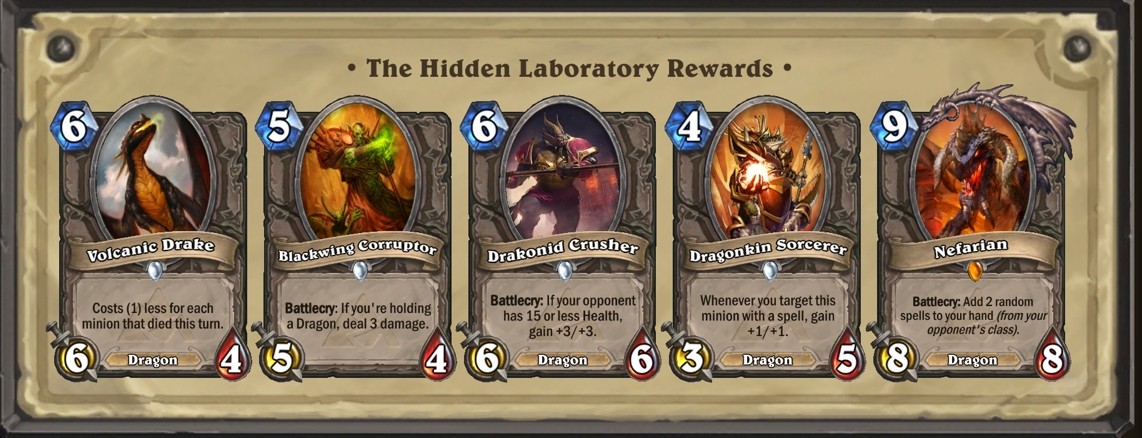
Defeating Omnotron gets you Volcanic Drake, a 6 Mana 6/4 Dragon which is a great card to drop after an AOE spell, but his low health makes him good only if dropped early in the game.
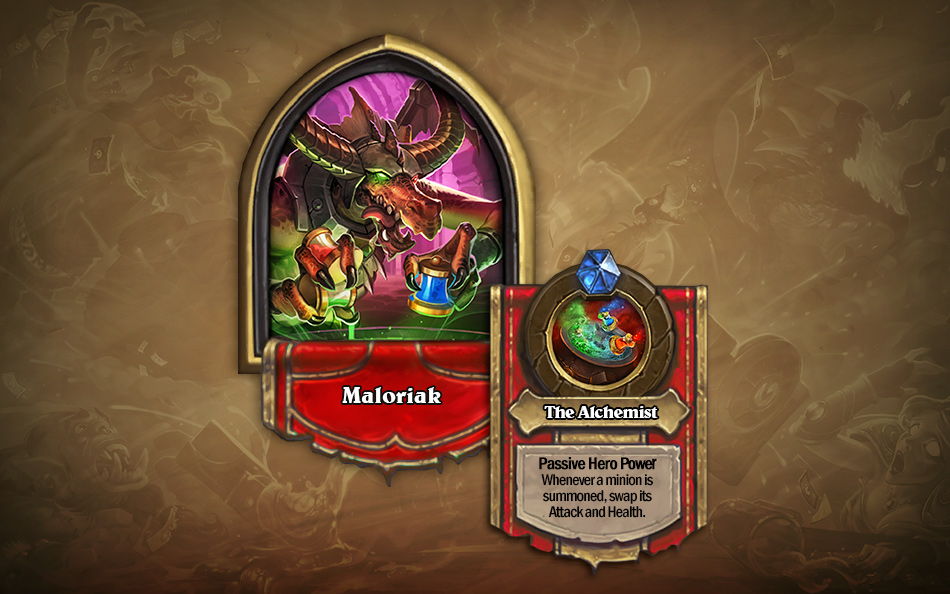
Maloriak Normal & Heroic Boss Guide
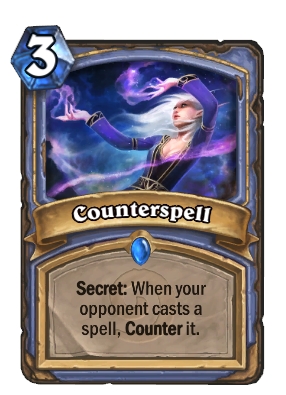
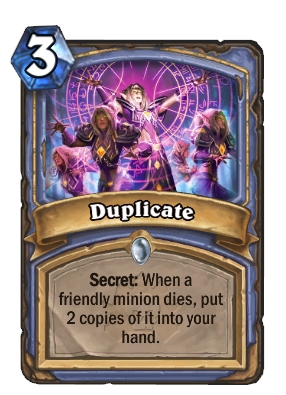
This Boss is pretty straight-forward with no really crazy shenanigans. His Hero Power is “The Alchemist: Whenever a minion is summoned, swap its Attack and Health" (on Heroic, his Hero Power also gives +2/+2 to his minions). This Hero power is applied to ALL minions summoned including ones from spells or battlecries. Bring along some low-attack high-health charge minions to take advantage of his hero power and be prepared to deal with plenty of secrets (He’ll play Counterspell and Duplicate often). If you think he’s played Duplicate, make sure you kill weak minions first so he doesn’t get more big guys in his deck for free. I enjoyed Polymorphing his big guys and then killing them so he would end up with three 1/1 Sheep in his deck. Also, be prepared to have to deal with more than a few Voidwalkers that can end up being quite annoying (the Mage Hero Power was very useful in killing those). Finally, keep in mind of all the Attack/Health reversals when multiple minions are spawned from spells or deathrattles because every time one is summoned, its Attack and Health will get reversed before it spawns another copy.
Maloriak’s Decklist is:
2x Counterspell
2x Duplicate
2x Mana Wyrm
2x Polymorph
2x Drain Life
2x Imp-losion
2x Voidwalker
2x Acidic Swamp Ooze
2x Crazed Alchemist
2x Drakonid Crusher
2x Faceless Manipulator
2x Flesheating Ghoul
2x Mad Scientist
2x Sludge Belcher
2x Release the Aberrations!
If you’re having a hard time, most Zoo decks will take care of Maloriak easily. Here’s nonnonx’s Demonlock Deck:
2x Imp-losion
1x Shadowflame
2x Darkbomb
2x Hellfire
1x Lord Jaraxxus
1x Mal’Ganis
1x Sylvanas Windrunner
2x Big Game Hunter
2x Kezan Mystic
2x Mind Control Tech
2x Mistress of Pain
2x Sludge Belcher
2x Annoy-o-Tron
2x Imp Gang Boss
2x Voidcaller
2x Zombie Chow
2x Voidwalker
When you defeat Maloriak, you’ll get Blackwing Corruptor, a 5-mana 5/4 minion that synergizes well with Dragon decks. His stats are fine, if nothing exceptional, but he can add some relatively-cheap removal to a Dragon-themed deck, as long as such decks actually become viable in the meta.
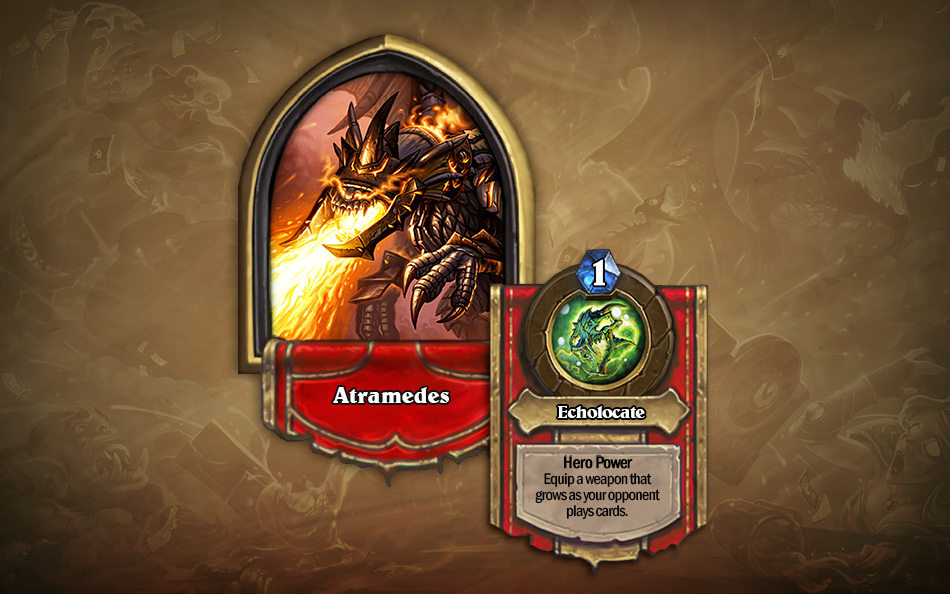
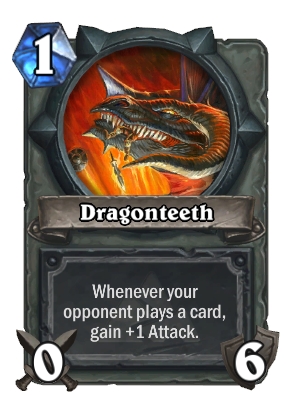
Atramedes Normal & Heroic Boss Guide
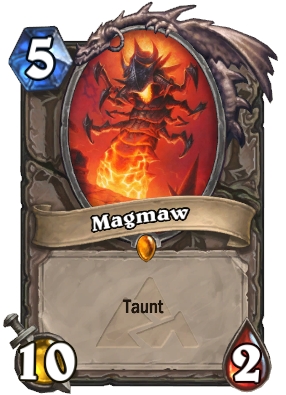
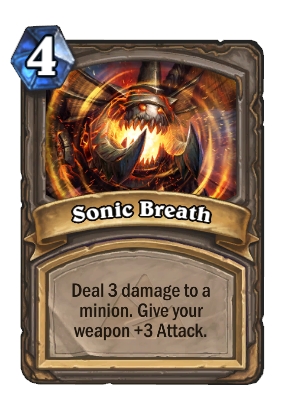
This Boss brings something new to Blackrock Mountain encounters because his main threat is his Weapon rather than minions or spells. Atramedes’ Hero Power is “Echolocate: Equip a weapon that grows as your opponent plays cards" and costs 1 mana (0 in Heroic), so this Boss will have a Dragonteeth equipped almost every turn, which makes playing cards tricky. You should bring Acidic Swamp Ooze and Sabotage to take care of his weapon and, of course, a Harrison Jones so you can draw loads of cards. Freezing Atramedes also helps keep his attacks at bay. Strong Taunt cards can also help because Atramedes’ weapon starts off with 0 Attack so you can hold him off easily with a strong Taunt. He’ll be playing Magmaw, who you should be able to take care easily. Keep Sonic Breath in mind because it can make the weapon’s Attack go up suddenly. On Normal difficulty, you’ll get 3 Reverberating Gongs, which can take care of Atramedes’ weapon if it’s getting out of control.
Atramedes Decklist is:
1x Solemn Vigil
1x Sonic Breath
1x Azure Drake
1x Dragon Egg
1x Twilight Drake
2x Dark Iron Dwarf
1x Faerie Dragon
1x Blackwing Technician
1x Drakonid Crusher
1x Twilight Whelp
1x Volcanic Drake
If you can’t kill him easily, use StyleMagnus’ Freeze Mage:
2x Ice Block
2x Blizzard
2x Ice Barrier
2x Ice Lance
1x Flamestrike
2x Frost Nova
2x Frostbolt
1x Mirror Image
2x Arcane Intellect
2x Arcane Missiles
1x Flame Leviathan
1x Harrison Jones
2x Molten Giant
2x Flamewaker
2x Acidic Swamp Ooze
2x Snowchugger
2x Water Elemental
Once you finish off Atramedes, you’ll get a great card, Drakonid Crusher, a 6-mana 6/6 Dragon who gets nicely buffed if the opponent’s health is low. This guy will see a lot of play even outside Dragon-themed decks because he has good stats for his mana, even without the buff, and he’s outside Big Game Hunter range.
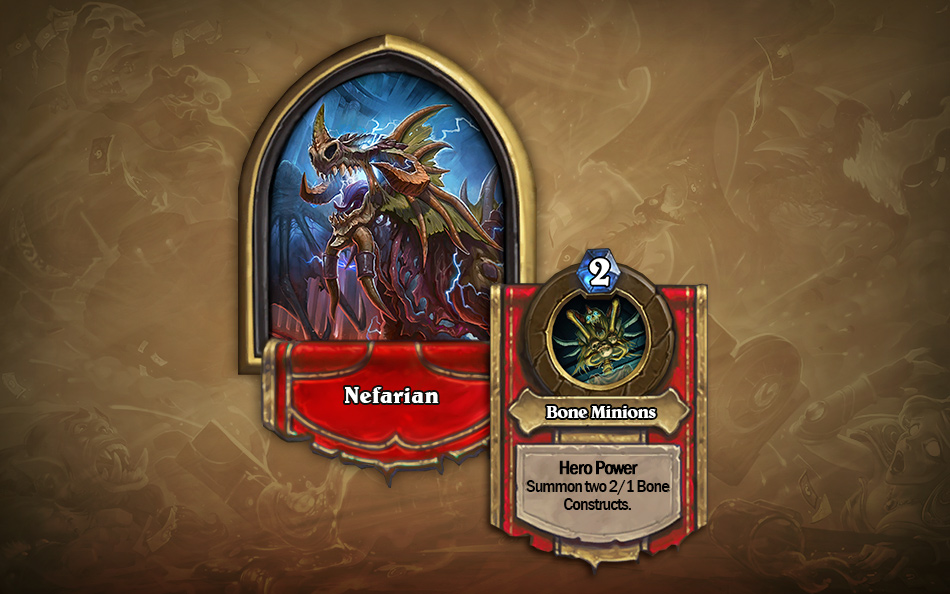
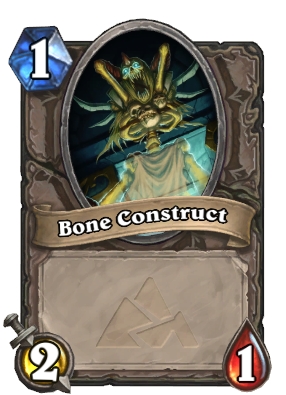
Nefarian Normal & Heroic Boss Guide
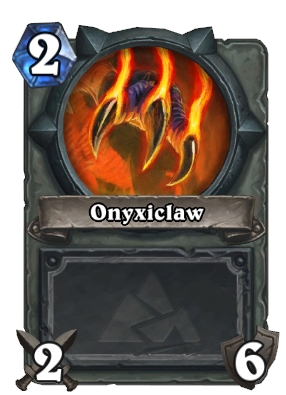
And we’ve reached the end of this wing and the whole adventure as only Nefarian is left. Nefarian has 30 health on both Normal and Heroic and 10 Armor on Normal and 30 Armor on Heroic. His Hero Power is “Summon two 2/1 (4/2 on Heroic) Bone Constructs" and costs 2 mana. Nefarian transforms a few times throughout this encounter: when you remove his armor, he’s replaced by Onyxia, and when she dies, Nefarian returns with the same health he had before Onyxia came into play. Onyxia uses Onyxiclaw often and her Hero Power allows her to hit you for a different amount of damage each turn (1,2,1,3,1,4,0,20), so taking care of her quickly is imperative. When Nefarian comes back in play, he clears the board.
For this Boss, you’ll need to have good board control (twice, since you’ll lose your board when Nefarian returns) and some good AOE spells so you don’t get overwhelmed by the Bone Constructs. Taunt minions can help protect your health if you can’t clear the board, but they won’t be winning you the game. When you see his Nerubian Eggs on the board, take care of them quickly because he’ll use Power Overwhelming to get a lot of value out of them. Nefarian has plenty of removal spells in his deck, so bring strong minions with a lot of health or strong deathrattle effects, otherwise you’ll have a hard time keeping control of the board. Finally, since Onyxia comes equipped with a weapon, all that we said regarding Atramedes and his weapon still applies here. In general, play a good control deck that uses deathrattle minions which can take advantage of Nefarian’s board clear.
Nefarian’s decklist is:
2x Shadowflame
1x Power Overwhelming
2x Dragon’s Breath
2x Soulfire
1x LAVA!
2x Tail Swipe
1x Chromaggus
2x Dragon Egg
2x Nerubian Egg
2x Twilight Drake
3x Blackwing Technician
2x Dragonkin Sorcerer
2x Drakonid Crusher
2x Twilight Whelp
2x Volcanic Drake
If you are having trouble finishing Nefarian, try Celadoncvo’s deck:
2x Light of the Naaru
2x Circle of Healing
2x Inner Fire
2x Divine Spirit
2x Holy Nova
1x Shadow Word: Death
2x Velen’s Chosen
2x Holy Smite
2x Power Word: Shield
1x Kel’Thuzad
1x Sea Giant
2x Deathlord
2x Lightwell
2x Mind Control Tech
2x Earthen Ring Farseer
1x Temple Enforcer
2x Dark Cultist
When you defeat Nefarian, you’ll receive Dragonkin Sorcerer, a 4-mana 3/5 Dragon that many players are excited about because of his strong base stats and his ability to synergize well with dragons and mechs. He’ll also take quite some buffing to bring his attack above Big Game Hunter range, so you are safe from that.
Clearing the whole Wing will get you the final Legendary of Blackrock Mountain Adventure, Nefarian, a 9-cost 8/8 Dragon who’s left most people unimpressed because his ability to get two random cards from the enemy’s class will mostly get you spells you won’t have much use for. Add to that that he’s very slow and he’s Big Game Hunter prey, and you can see why he isn’t all that much.
Class Challenge – Paladin
There’s only one Challenge this week, and that’s the Paladin one. You’ll be playing against Omnotron Defense System in this challenge. Your deck is Dragon-themed and consists of these cards:
1x Coghammer
1x Lay on Hands
1x Blessed Champion
1x Blessing of Wisdom
2x Blessing of Kings
1x Consecration
1x Chromaggus
2x Dragon Consort
2x Blackwing Technician
3x Dragonkin Sorcerer
2x Shielded Minibot
As with the other battles in this wing, go for board control by using Coghammer to give you strong Taunts and buff Dragonkin Sorcerers with Blessing of Kings to really get them out of control. Since you’ve already played this Boss and you remember the sequence in which he summons his Legendaries, plan your strategy accordingly. Overall, like all the other Blackrock Mountain challenges, this one is pretty easy too and allows you to see how the Priest Dragon deck can work.
Beating the challenge will get you Solemn Vigil, a good Paladin spell that will help you draw lots of cards after AOE spells. Card draw is always useful, but this one might be a bit too situational and slow in the current meta to be that useful. Still, I’m sure it’ll find a place in some Paladin decks.
And now that this Guide is done, we’ve reached the end of Blackrock Mountain Adventure. It’s going to be very interesting to see how the various cards the Adventure delivered will change the meta (in my opinion, I don’t see the changes in the meta being as drastic as after Goblins Vs Gnomes was released). I hope you’ve found these guides of use. Good luck beating the Adventure, and I’ll see you in-game.